本文共 3430 字,大约阅读时间需要 11 分钟。
目录
一、指定运行级别
1.运行级别说明
0:关机
1:单用户(找回丢失密码)
2:多用户状态没有网络服务
3:多用户状态有网络服务
4:系统未使用保留给用户
5:图形界面
6:系统重启
常用的运行级别是3和5,也可以自己指定运行级别:
#指定运行级别init [0123456]
我们来演示一下:
比如我们打开自己的图形界面,因为是图形界面,所以运行级别是5。我们右键点击打开终端,然后输入init 3

我们输入回车就会变成命令行格式:

2.CentOS7后运行级别说明
#查看当前运行级别systemctl get-default#运行级别3multi-user.target#运行级别5graphical.target#设置运行级别,其中TARGET就是对应上面的级别3和5systemctl set-default TARGET.target
我们看一下例子:
我们先查看当前运行级别是5,然后我们设置成3

二、找回root密码(经典面试题)
如果你忘了root密码,登不上root账号了,怎么办?
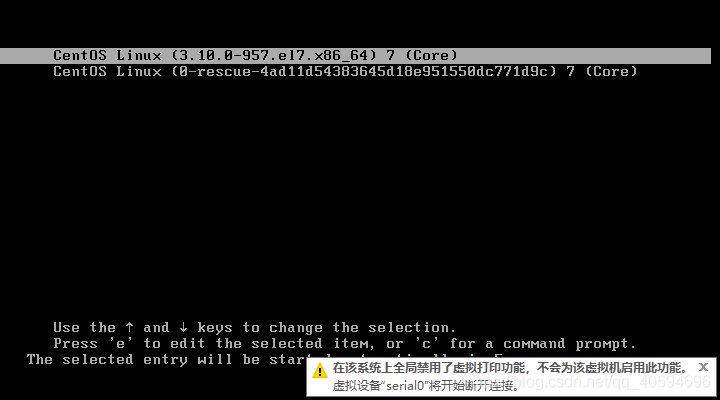
1.启动系统,快速按"e"进入编辑页面
在这个页面,我们按e,稍微快一点,不然会自己跳到下一步。

我们一旦按e,会进入这个编辑页面

2.找到linux16那一行,输入init=/bin/sh,再按ctrl+x进入单用户模式
进入编辑页面之后,找到linux16为头的那一行,如果你仔细看上面的图,你可能会发现,他没有linux16这一行,需要往下拉,下面还有东西的。

我们在这一行后面增加
init=/bin/sh

输入完成之后,按ctrl+x进入单用户模式,此时页面是这样的:

3.单用户模式进行输入
在单用户模式输入如下:(此处建议复制,空格要注意)
mount -o remount,rw /
回车后输入:
passwd

此时会有一个passwd ...的那一行。
继续输入:
touch /.autorelabel
然后再输入:
exec /sbin/init

这个时候你会得到这个页面:

此时注意:不要动,等着。这个可能需要一段时间,不要动啊,各位!!!
然后,页面会自动重启:

我们使用root,以及新密码登录即可
4.修改root密码,改成自己喜欢的
passwd root
三、常用指令(重点)
1.man:获得帮助信息
基本语法:
man [命令或配置文件]
比如我们输入man ls,会出现如下:

想看下一页,按一下空格键。
想回到命令行状态,按一下"q"
注:linux下隐藏文件以"."开头
2.help:获取shell内置命令的帮助信息
3.psw:显示当前工作目录的绝对路径
4.ls:查看内容
ls [选项] [目录或者文件]
-a:显示当前目录所有的文件的目录,包括隐藏的
-l:以列表的方式显示信息
5.cd:切换到指定目录
回到上一级目录:
cd ..
回到家目录:cd
6.mkdir:创建目录
mkdir [选项] 要创建的目录
-p:创建多集目录
7.rmdir:删除空目录
如果目录里面有内容,使用:(递归强制删除)
rm -rf 要删除的目录
8.touch:创建空文件
touch 文件名称
9.cp:拷贝文件到指定目录
cp [选项] source dest
-r:递归复制整个文件夹
如果你的文件人家原本有了,你再复制一份,就存在覆盖的问题,当然,你可以输入y表示覆盖,当文件很多的话这样很麻烦,我们可以强制覆盖不提示:
\cp [选项] source dest
10.rm:移除文件或目录
rm [选项] 要删除的文件和目录
-r:递归删除整个文件夹
-f:强制删除不提示
11.mv:移动文件与目录,或者重命名
mv oldNameFile newNameFile
如果两个文件目录在同一个目录,表示重命名,不然就是移动。
12.cat:查看文件内容
cat [选项] 要查看的文件
-n:显示行号
注:cat只能浏览文件,不能修改文件,为了浏览方便,一般会带上"|more":(按回车查看下一行,按空格查看下一页)
cat [选项] 要查看的文件 | more
13.more:分页显示文本内容
more 要查看的文件
因为是分页的,more后还有一些操作指令:
空格键:查看下一页
回车:查看下一行
q:离开more
ctrl+f:向下滚动一屏
ctrl+b:返回上一屏
=:输出当前行行号
:f:输出文件名和当前行的行号
14.less:分屏查看文件内容
less 要查看的文件
功能和more类似,但是比more更强大,支持各种现实终端。查看比较大的文件建议用less
空格键:查看下一页
pagedown:向下翻页
pageup:向上翻页
/字符串:向下搜索,n:向下查找,N:向上查找
?字符串:向上搜索,n:向上查找,N:向下查找
q:离开
15.echo:输出内容到控制台
echo [选项] [输出内容]

16.head:显示文件的开头部分,默认显示文件的前10行内容
head 文件名#查看指定行数文件head -n 数字 文件名

17.tail:显示文件尾部,默认显示后10行
tail 文件名#查看指定行数文件tail -n 数字 文件名#实时追踪文档的更新状况tail -f 文件名
(1)退出监控状态:ctrl+c
(2)我们在虚拟机里面,通过echo指令往文件里面写东西,然后监控的tail处就会更新:
一个箭头表示覆盖,两个箭头表示追加。


(3)显示日历信息:cal


18.ln:软链接,也叫符号链接。类似于windows里面的快捷方式,主要存放了链接其他文件的路径
#给原文件创建一个软链接名ln -s [原文件] [软链接名]
示例:
将root在home下弄一个快捷方式,再删除

19.history指令:查看已经执行过的历史命令,也可以执行历史指令
#查看所有历史命令history#查看最后10条历史命令history 10#执行历史编号为5的指令!5
我们先history查出历史命令,然后通过!5执行历史指令

20.date指令:日期
(1)显示当前日期
#显示当前时间date #显示年date +%Y#显示月date +%m#显示日date +%d#显示年月日时分秒date "+%Y-%m-%d %H:%M:%S"

(2)设置日期
date -s 字符串时间

(3)显示日历
#显示当前日历cal#显示整年的日历cal 2021
21.find指令:从指定目录向下递归遍历其各个子目录,将满足条件的文件或者目录显示在终端
find [搜索范围] [选项]
-name:按照文件名查找
-user:按照用户查找
-size:按照文件大小查找(+n:大于 -n:小于 n:等于)(文件单位k,M,G)

我们通过ls查看文件的时候,为了方便看文件大小,可以加上h参数。

22.locate指令:快速定位文件路径
#如果是第一次使用,需要使用updatedb创建locate数据库locate 搜索文件
注:由于locate基于数据库进行查询,第一次运行前,必须使用updatedb指令创建locate数据库。
 23.which指令:查看某个指令在哪个目录下
查看ls在哪个目录下:

24.grep指令和管道符号
管道符:"|",它表示将前一个命令的处理结果输出传递给后面的命令处理。
grep [选项] 查找内容 源文件
-n:显示匹配行和行号
-i:忽略字母大小写

25.gzip/gunzip指令:压缩/解压
#将文件压缩成*.gz文件gzip 文件#解压缩gunzip 文件.gz

26.zip/unzip指令:压缩/解压,常用于项目打包发布
#压缩zip [选项] xx.zip 将要压缩的内容#解压unzip [选项] xx.zip
zip常用选项:
-r:递归压缩,即压缩目录
unzip常用选项:
-d <目录>:解压后的文件存放的目录


27.tar指令:解压缩都是tar
tar指令是打包指令,最后打包后的文件是xx.tar.gz的文件
tar [选项] xx.tar.gz 打包的内容
-c:产生.tar打包文件
-v:显示详细信息
-f:指定压缩后的文件名
-z:打包同时压缩
-x:解包.tar文件
-C:解压到指定目录
示例:


转载地址:http://pfmoz.baihongyu.com/